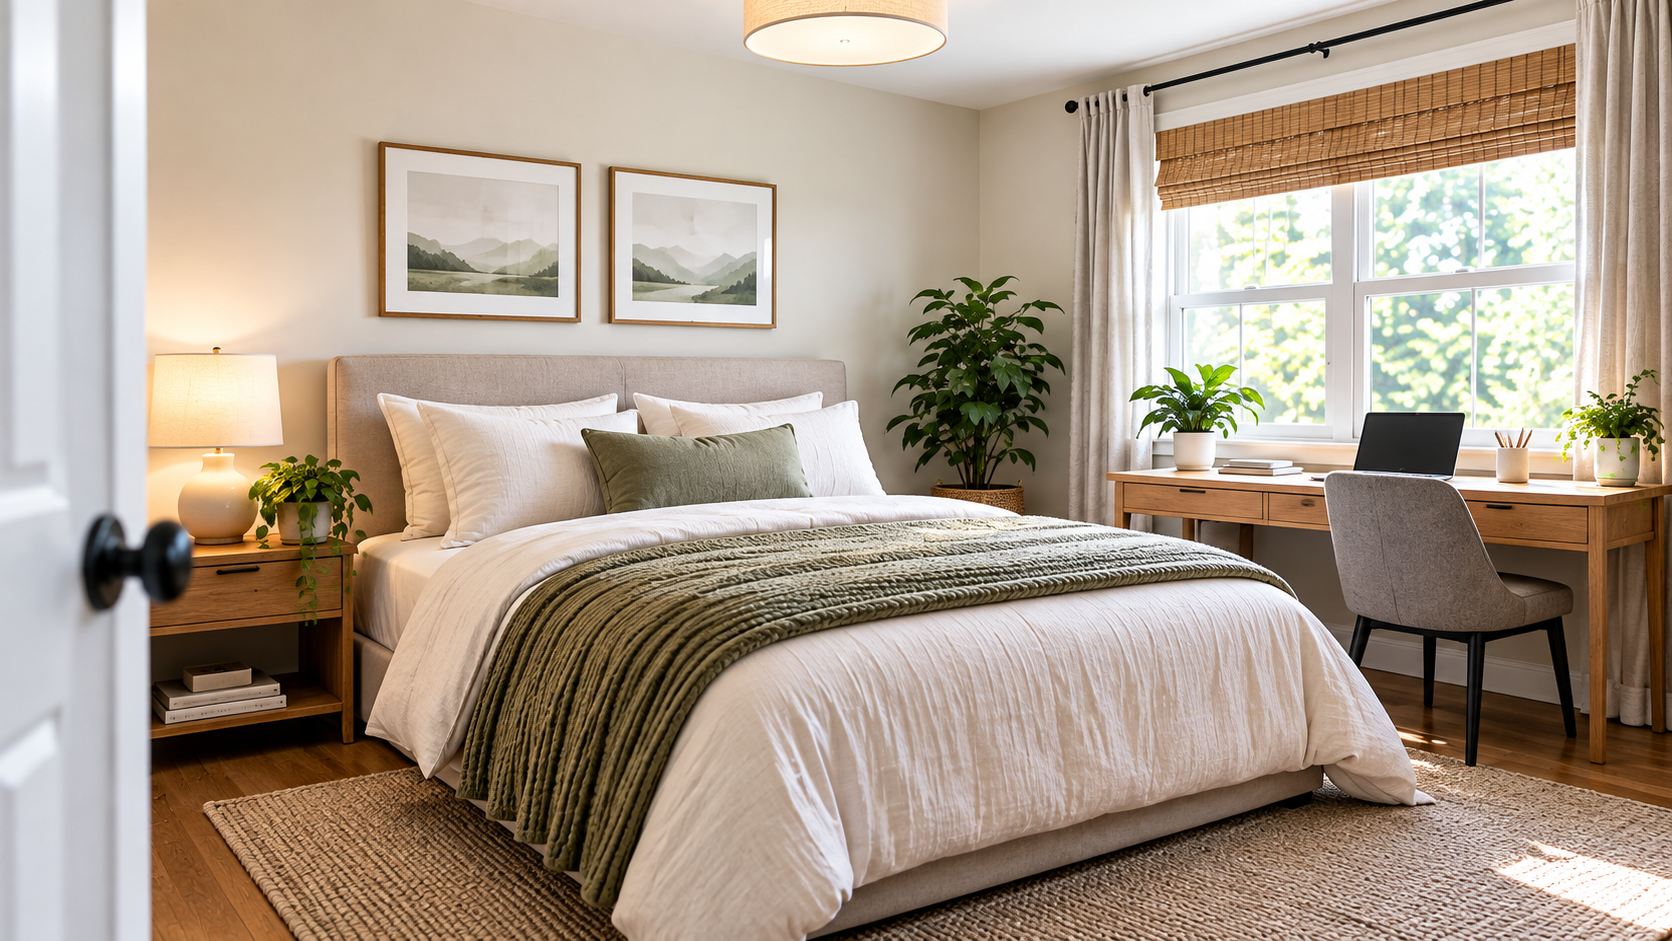
Can you fit a queen bed and a desk in a 10×12 bedroom without making the room feel cramped?
Yes—a queen bed and a compact desk can fit in a 10×12 bedroom. But fitting the furniture is only the beginning. You also need enough room to enter, reach the bed, pull out your desk chair, and use the room comfortably.
A 10×12 bedroom provides 120 square feet of floor space. We developed three measured reference layouts using the same queen bed, compact desk, and reserved chair-use area.
Each arrangement offers a different way to organize the room:
- Layout A: Queen bed along a side wall, desk near the window.
- Layout B: Queen bed along a side wall, desk near the entrance.
- Layout W1: Queen bed centered beneath the window, desk along the opposite side of the room.
These layouts demonstrate possible furniture arrangements under specific assumptions. They are not guarantees that the same furniture will work in every 10×12 bedroom.
Will a Queen Bed and Desk Fit in a 10×12 Bedroom?
Yes, provided the furniture dimensions and room features are compatible.
A standard queen mattress measures approximately 60 × 80 inches. However, a bed frame can extend beyond the mattress, especially when it includes a substantial headboard or footboard.
For our reference layouts, we use a slightly larger 62 × 82-inch bed frame and a compact 42 × 24-inch desk.
Measurements Used in Our Layouts
| Item | Reference dimensions |
|---|---|
| Bedroom | 120 × 144 inches (10 × 12 ft) |
| Queen mattress | 60 × 80 inches |
| Queen bed frame | 62 × 82 inches |
| Compact desk | 42 × 24 inches |
| Reserved desk-chair use zone | 30 × 30 inches |
| Entry door | 30 inches wide |
The reference room assumes an inward-opening entry door near one corner of the 10-foot wall and a window centered on the opposite wall.
We have not included a projecting built-in closet, radiator, or other fixed obstruction.
Before choosing a layout: Measure the outside dimensions of your actual bed frame and desk. Also record the location of doors, windows, closet openings, outlets, and heating equipment.
Layout A: Queen Bed Along the Side Wall, Desk Near the Window
Best for: Keeping the workstation toward the window end of the bedroom.
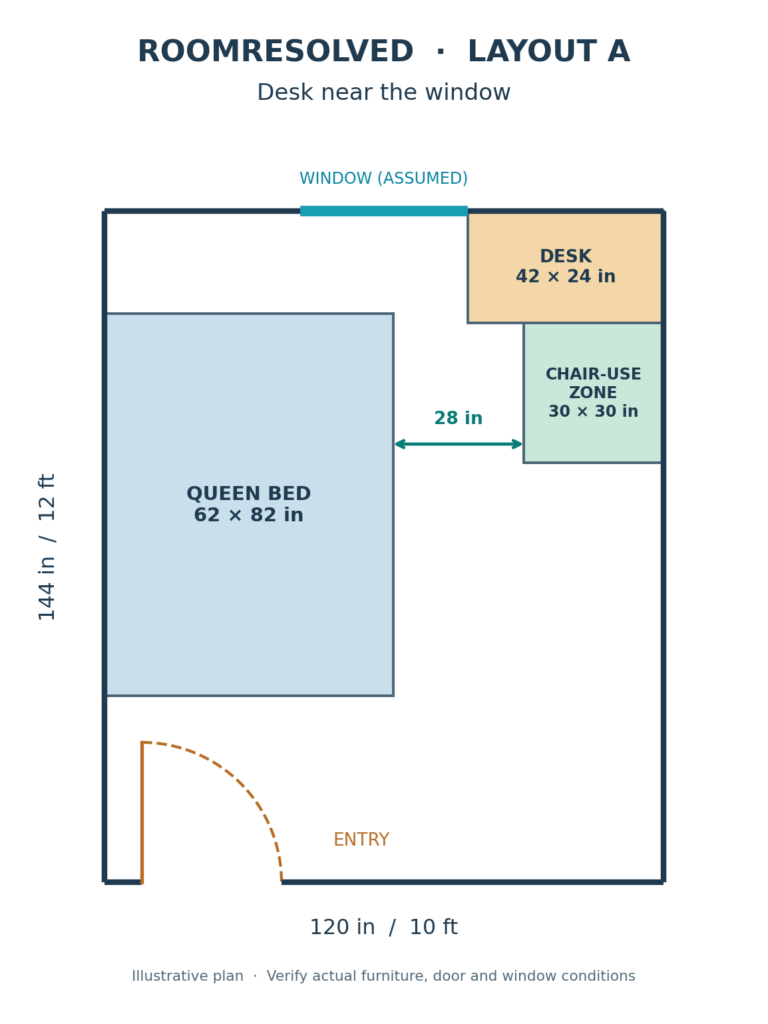
In Layout A, the queen bed runs lengthwise against the left wall. The compact desk occupies the far-right corner near the window, with the reserved chair-use area extending into the room.
This separates the sleeping and working furniture across opposite sides of the bedroom.
Why Layout A Can Work
The bed and desk fit within the room’s boundaries without overlapping. The reference plan also preserves an approach to the exposed side of the bed.
Where the bed and reserved chair-use zone face one another, the measured lateral gap is 28 inches.
That is a local measurement between furniture zones—not a guarantee that every movement through the room will have 28 inches of clearance.
Advantages
- Keeps the desk toward the window, where natural light may be available.
- Separates the workstation from the main sleeping area.
- Leaves the center and entrance portion of the room relatively open.
Limitations
The bed is primarily accessible from one side, which may be inconvenient for two people sharing it.
The desk is also close to the window. Depending on its height and exact position, it could interfere with curtains, blinds, or window operation.
Layout A verdict: A useful starting arrangement for someone who wants a desk near the window and is comfortable with mainly one-sided bed access.
Layout B: Queen Bed Along the Side Wall, Desk Near the Entrance
Best for: Keeping the workstation near the doorway instead of the window end.
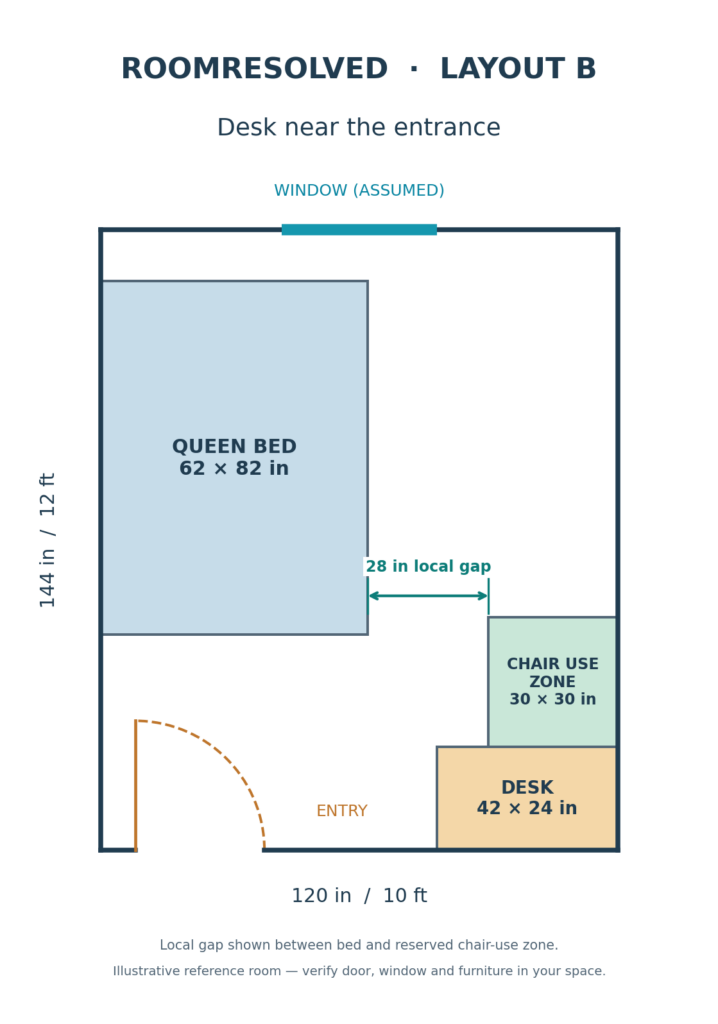
Layout B retains the queen bed along the left wall but moves the desk to the lower-right corner, close to the entrance.
This creates a different division of the room: the workstation is near the doorway, while the bed occupies the opposite portion of the space.
Why Layout B Can Work
The bed, desk, and reserved chair-use zone fit inside the reference room without overlapping.
The measured lateral separation between the bed and chair-use zone is 28 inches in the relevant portion of the plan.
The bed’s upper end is positioned 12 inches from the window wall. That space should not be treated as a walkway behind the bed.
Advantages
- Keeps the workstation near the entrance.
- Leaves the far-right corner free.
- May suit bedrooms where outlets or window coverings make a window-end desk less convenient.
Limitations
The desk and chair-use zone occupy space near the doorway. The actual door swing and chair movement must be checked carefully.
The bed also sits relatively close to the window wall, so its headboard, nearby window hardware, and window coverings may affect usability.
Like Layout A, this arrangement primarily provides access from one side of the bed.
Layout B verdict: A practical alternative worth testing when an entrance-end workstation better matches the room’s fixtures and daily use.
Layout W1: Queen Bed Centered Beneath the Window
Best for: Creating a centered bed arrangement when the window configuration allows it.
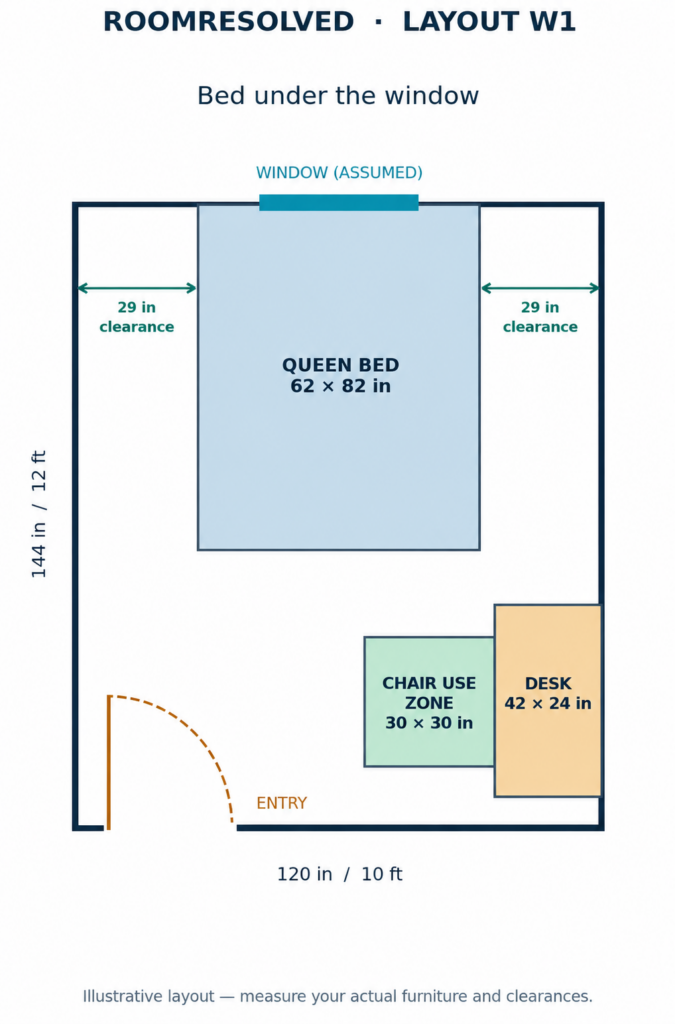
In Layout W1, the queen bed is centered against the 10-foot window wall. The compact desk sits along the right wall, closer to the entrance.
This is a different furniture arrangement from the first two layouts because the bed changes orientation.
Why Layout W1 Can Work
The 62-inch-wide bed is centered within the 120-inch room width.
That leaves:
(120 − 62) ÷ 2 = 29 inches
of floor space on each side of the bed.
However, equal space on both sides does not necessarily mean equal access.
The desk’s reserved chair-use zone restricts the approach toward the right side of the bed. Under our reference arrangement, the left side provides the more practical modeled approach.
Advantages
- Creates a visually balanced, centered bed position.
- Offers an alternative to placing the bed against a side wall.
- Leaves measurable space beside both edges of the bed.
Limitations
The 29-inch side gaps are local clearances. They should not be interpreted as proof that both sides are continuously accessible.
More importantly, the bed is positioned beneath a window. Whether this works depends on the headboard height, window sill, opening mechanism, curtains or blinds, heating equipment, and any emergency escape requirements.
Layout W1 verdict: A legitimate conditional arrangement for rooms where the bed can safely sit beneath the window and primarily one-sided access is acceptable.
Which Layout Is Best for Your 10×12 Bedroom?
The best arrangement depends on how you use the bedroom and where its fixed features are located.
| Your priority | Layout to consider |
|---|---|
| Desk near the window | Layout A |
| Desk near the entrance | Layout B |
| Centered bed arrangement | Layout W1 |
| Access to both sides of the bed | None is verified for this requirement |
| Large desk or oversized bed frame | Recheck dimensions before choosing |
Our preference for a starting point is Layout A, because it separates the workstation and bed while keeping the entrance portion relatively open.
However, Layout B may work better for a particular doorway or outlet arrangement, while Layout W1 offers a different bed orientation where window conditions permit.
How Much Walking Space Do You Need?
A room can look spacious in a floor plan but feel cramped once furniture is in everyday use.
For this reference study, we used 24 inches as a compact route-screening threshold, with approximately 30 inches preferred where practical.
These are planning assumptions used for comparing layouts, not universal building-code or accessibility standards.
A few important distinctions matter:
Local clearance: The measured gap between two nearby objects, such as the 28-inch separation shown in Layouts A and B.
Continuous access route: An unobstructed path connecting the doorway to the place you need to reach.
Chair-use space: The area reserved for sitting at and moving away from the desk. Our green chair-use zones are planning allowances, not drawings of actual chair footprints.
A room may have an adequate local gap while still having an inconvenient route because of a desk chair, door, or other obstruction.
Always test the arrangement with the chair pulled out and the doors operating normally.
Can You Put a Queen Bed Under a Window?
Yes, in some bedrooms.
There is no universal furniture-layout rule that prohibits positioning a bed beneath a window. Whether it works depends on the actual window and furniture.
For example, a low headboard beneath a higher window may leave the glass and opening hardware unobstructed.
A tall headboard beneath a low window could create problems.
Before using Layout W1, check:
- Whether the headboard blocks the window or its operating hardware.
- Whether curtains and blinds can move freely.
- Whether the bed obstructs a radiator, vent, or other heating equipment.
- Whether the window can be accessed for normal operation and maintenance.
- Whether the arrangement interferes with any window required for emergency escape.
The key principle: A window-wall bed should be evaluated using actual dimensions and functional requirements, rather than automatically accepted or rejected.
Five Measurements to Check Before Rearranging
1. Measure the room
Measure the finished wall-to-wall width and length. Do not assume the room is exactly 120 × 144 inches because it is advertised as 10×12.
2. Measure the complete bed frame
Include the headboard, footboard, and any parts extending beyond the mattress.
3. Measure the desk and chair
Record the desk’s full dimensions and the space your actual chair requires when occupied or pulled backward.
4. Mark fixed room features
Include the entry-door swing, closet doors, windows, radiators, vents, and other obstructions.
5. Test the usable routes
Check whether you can enter the room, reach the bed, sit at the desk, open doors, and operate the window without awkward obstruction.
You can test furniture positions using a scaled drawing or painter’s tape on the floor before moving heavy items.
Final Takeaway
A 10×12 bedroom can accommodate a queen bed and a compact desk, but the most effective arrangement depends on furniture dimensions, circulation, and fixed room features.
Our three reference layouts demonstrate different approaches:
- Layout A: Side-wall bed with a window-end desk.
- Layout B: Side-wall bed with an entrance-end desk.
- Layout W1: Centered window-wall bed with a side-wall desk.
Each arrangement fits the stated furniture footprints and offers a modeled approach to the bed under the reference assumptions. None should be treated as a universal solution or a guarantee of comfortable two-sided bed access.
Explore more practical room arrangements in our Bedroom Layouts guide.
Measure your room, check the actual clearances, and choose the arrangement that remains practical when the furniture is in use.